Individual measurements from different cameras can be merged manually, combining the data into a single image. Data can be merged by scaling down images to the lowest pixel x-resolution, or to the highest y-resolution, or by stacking images side by side.
Merging can also be performed automatically when you use Recorder to capture data from cameras. Learn more in Using multiple cameras.
Merging recorded measurements manually
Measurements can be merged in Breeze by selecting two or more measurements in a group by shift-clicking on them, and then right-clicking and selecting Merge.

The Merge dialog is displayed where you provide a name for the new merged measurement, and select how to merge the data.
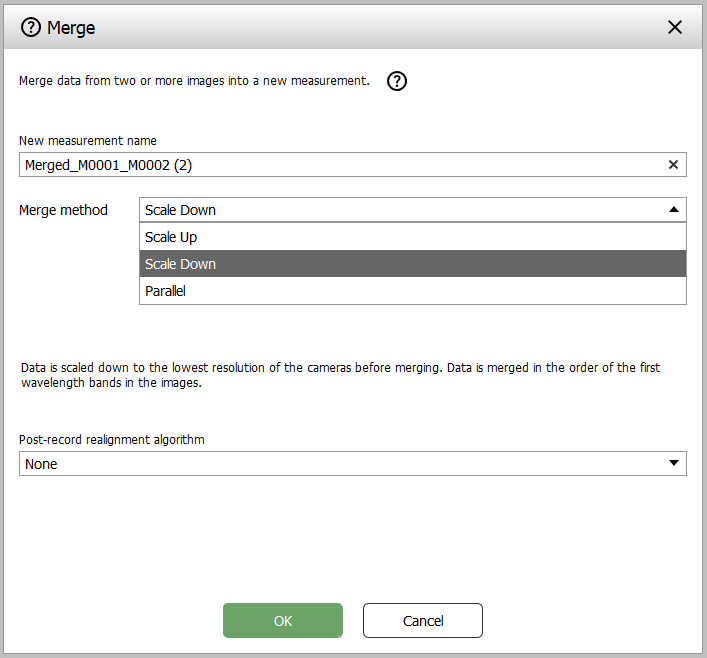
The merge methods are:
-
Scale down - Data is scaled down to the lowest resolution of the cameras. Data in the images is ordered by the first wavelength of each image.
-
Scale up - data is scaled to the highest resolution of the cameras and merged as for Scale down.
-
Parallel - Data from identical cameras mounted side by side (for example on a conveyor belt) are merged along the x-direction resulting in a wider image. The bands for the cameras are not merged.
During merging, optional realignment algorithms can be used. Learn more below.
When merging manually, the images are always stacked in the data cube, ordered in order of increasing wavelengths, unlike in Recorder where the order of cameras in Settings are used as describe in Using multiple cameras.
Merging with Scale Down or Scale Up only works for cameras with non-overlapping wavelength bands, because the bands in Breeze have identifiers, and more than one band with the same identifier will cause problems.
Optional realignment of images during merge
You can use an optional realignment algorithm to process the merged image in an attempt to align features detected in the sub images.
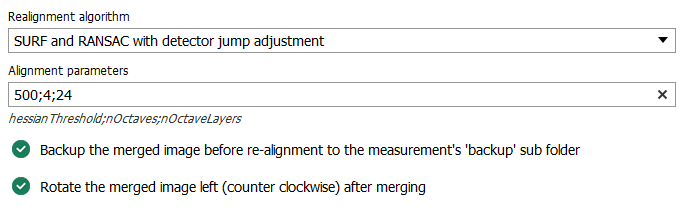
The algorithms are:
-
None - no realignment will take place. This corresponds to the behavior of merge in real-time Continuous (Play) mode in Recorder and in Breeze Runtime scenarios.
-
SURF and RANSAC with detector jump adjustment
-
SIFT and RANSAC with detector jump adjustment
-
ORB and RANSAC with detector jump adjustment
-
Contours-based alignment using centroid with detector jump adjustment
-
Detector jump adjustment only
To learn more about these algorithms, you can start by Speeded up robust features - Wikipedia for a high level overview. Breeze’s implementation uses the OpenCV - Open Computer Vision Library
While image alignment techniques can merge spectral data cubes, this approach sacrifices spectral fidelity in each pixel. These methods rely on automatic timepoint detection for image co-registration, which can especially struggle with non-flat scenes. To compensate for misalignment, the process adjusts the spectra, potentially distorting the very data you are trying to capture. For high-fidelity spectral information, separate, unmerged cubes are recommended.
The quality of merged images can vary significantly based on several factors, including the compatibility of the shapes and sizes of the images, differences in lighting conditions and shadow placements, and the technique used for merging. Inconsistent shapes, mismatched lighting, and merging methods can lead to noticeable, distortions, and unnatural transitions. Achieving a seamless merge may require adjustments and optimizations specific to each set of images, and perfection is not guaranteed.
Other merge options
When merging you also have the option to create a backup of the merged measurement, before realignment. This backup is placed in a ‘backup’ sub folder of the measurement’s folder.
In addition you can also rotate the merged image left (counterclockwise) after merging and realignment.
How to evaluate merging using Pseudo RGB visualizations
You can evaluate the results of a merge in in Breeze by using Pixel Explore and its Pseudo RGB visualization of selected bands:
In Pixel Explorer, drag and move the Red, Green or Blue bands so that they match the wavelengths used in the merged sub images. The resulting Pseudo RGB visualization should give you an indication if the merge is correct.
For example: if the Red band is selected from the first sub image, and the Blue band is selected from the second, the resulting red/blue image should show the same objects on the same position in the resulting image.
How to evaluate merging using the keypoint_mapping.png file
The realignment algorithms SURF, SIFT and ORB attempt to detect and match features of the images that are merged. To help evaluating these methods, Breeze automatically creates a keypoint_mapping.png file in the measurement’s folder.
This image shows the detected features in the individual measurements, and lines that connect the features.
Image realignment algorithm parameters
Most of the realignment algorithm have settings that you provide as a semicolon separated string in. The options for these algorithms are described below. Learning how to set these parameters is out of scope here.
Contours-based alignment using centroid with detector jump adjustment
Specify the preprocessing steps to use. Select among the below steps, and specify the selected methods as a semi-colon separated string.
-
GrabCut - Applies the GrabCut algorithm to segment the foreground from the background. Useful for isolating objects of interest before contour detection.
-
Dilate - Uses dilation to expand shapes contained in the image. This can help make contours more pronounced.
-
Scharr - Applies the Scharr operator to detect edges. Offers a good balance between sensitivity and edge localization.
-
Sobel - Utilizes the Sobel operator to highlight edges. Effective for enhancing vertical and horizontal edges.
-
Contour - Directly extracts contours without applying any additional preprocessing. Best for images with clear contrast between objects and the background.
-
Laplacian - Uses the Laplacian of Gaussian method for edge detection. Helps in highlighting regions of rapid intensity change.
-
Canny - Employs the Canny edge detector for identifying edges. Known for its low error rate, making it ideal for images requiring precise edge detection.
For example:
Dilate;Canny
ORB and RANSAC with detector jump adjustment
Specify settings for the below parameters in the form a semi-colon separated string with values for each parameter, in order:
nFeatures;scaleFactor;nLevels;edgeThreshold;firstLevel;wtaK;patchSize;fastThreshold
-
nFeatures - The maximum number of features to retain.
-
scaleFactor - Pyramid decimation ratio, greater than 1. scaleFactor==2 means the classical pyramid, where each next level has 4x less pixels than the previous, but such a big scale factor will degrade feature matching scores dramatically. On the other hand, too close to 1 scale factor will mean that to cover certain scale range you will need more pyramid levels and so the speed will suffer.
-
nLevels - The number of pyramid levels. The smallest level will have linear size equal to input_image_linear_size/pow(scaleFactor, nlevels - firstLevel).
-
edgeThreshold - This is size of the border where the features are not detected. It should roughly match the patchSize parameter.
-
firstLevel - The level of pyramid to put source image to. Previous layers are filled with upscaled source image.
-
wtaK - The number of points that produce each element of the oriented BRIEF descriptor. The default value 2 means the BRIEF where we take a random point pair and compare their brightnesses, so we get 0/1 response. Other possible values are 3 and 4. For example, 3 means that we take 3 random points (of course, those point coordinates are random, but they are generated from the pre-defined seed, so each element of BRIEF descriptor is computed deterministically from the pixel rectangle), find point of maximum brightness and output index of the winner (0, 1 or 2). Such output will occupy 2 bits, and therefore it will need a special variant of Hamming distance, denoted as NORM_HAMMING2 (2 bits per bin). When WTA_K=4, we take 4 random points to compute each bin (that will also occupy 2 bits with possible values 0, 1, 2 or 3).
-
patchSize - size of the patch used by the oriented BRIEF descriptor. Of course, on smaller pyramid layers the perceived image area covered by a feature will be larger.
-
fastThreshold - the fast threshold
SIFT and RANSAC with detector jump adjustment
Specify settings for the below parameters in the form a semi-colon separated string with values for each parameter, in order:
nFeatures;nOctaveLayers;contrastThreshold;edgeThreshold;sigma
-
nFeatures - The number of best features to retain. The features are ranked by their scores (measured in SIFT algorithm as the local contrast)
-
nOctaveLayers - The number of layers in each octave. 3 is the value used in D. Lowe paper. The number of octaves is computed automatically from the image resolution.
-
contrastThreshold - The contrast threshold used to filter out weak features in semi-uniform (low-contrast) regions. The larger the threshold, the less features are produced by the detector.
-
edgeThreshold - The threshold used to filter out edge-like features. Note that the its meaning is different from the contrastThreshold, i.e. the larger the edgeThreshold, the less features are filtered out (more features are retained).
-
sigma - The sigma of the Gaussian applied to the input image at the octave #0. If your image is captured with a weak camera with soft lenses, you might want to reduce the number.
SURF and RANSAC with detector jump adjustment
Specify settings for the below parameters in the form a semi-colon separated string with values for each parameter, in order:
hessianThreshold;nOctaves;nOctaveLayers
-
hessianThreshold - Only features with keypoint.hessian larger than that are extracted.
-
nOctaves - The number of a gaussian pyramid octaves that the detector uses. It is set to 4 by default. If you want to get very large features, use the larger value. If you want just small features, decrease it.
-
nOctaveLayers - The number of images within each octave of a gaussian pyramid. It is set to 2 by default.
Detector Jump Adjustment
The Detector Jump Adjustment is a spectral post-processing step used when merging data from two or more cameras to ensure a smooth transition across the combined spectrum. While algorithms like SURF and RANSAC handle the spatial alignment (stacking and registering the images), the Detector Jump Adjustment specifically addresses discontinuities in intensity where the spectral ranges of the cameras meet.
Even after reflectance has been calculated using dark and white references, subtle variations in sensor sensitivity or lighting can cause an abrupt "jump" in the spectral curve at the point where one camera's range ends and the next begins.
How it works
The adjustment focuses exclusively on the spectral overlap between the cameras:
-
Intensity Comparison: The algorithm looks at the overlapping wavelength bands between the cameras to measure the difference in intensity values.
-
Scale Factor Calculation: Using these differences, a scale factor is calculated to align the secondary camera's intensity with the primary camera.
-
Spectral Scaling: The entire spectrum of the secondary camera is scaled accordingly, ensuring the merged spectral curve is continuous and uniform.
Implementation and Persistence
When a merge is performed using an algorithm that includes detector jump adjustment:
-
Permanent Update: The result is applied directly to the merged reflectance file saved on disk. The pixel values in the data cube are updated to reflect the scaled intensity.
-
One-Time Application: Because the reflectance data itself is modified during the merge, the adjustment is persistent. The detector jump adjustment is baked into the file and will not be applied again during subsequent analysis of the data.