This page explains dark and white references and how they are used in Breeze.
About references
A digital hyperspectral image from a camera by itself in “raw” format is not suited for data analysis because it does not take into account the illumination of the scene nor the sensor baseline. If images are captured in varying conditions the same object will still not look the same.
To normalize images and make them comparable, Breeze uses dark references and white references, saved together with the image measurement. The dark and white references are themselves images, captured to cover the full field of view of the camera:
The Dark reference is typically captured with a closed camera shutter, and thus is essentially a dark image with low values. It is used to remove sensor noise/baseline offset.
The White reference is typically captured of a plate of white or light gray material, and results in a light image with high values. It is used to take illumination and sensor sensitivity into account.
Together, the reference images are used to convert the raw signals from the image into true Reflectance, which is well suited for data analysis.
Learn more how references are applied to measurements mathematically in Spectral imaging
Using the different spectral modes in Breeze
Measurements in Breeze can be converted automatically in the workflow between Radiance, Reflectance, Absorbance using the recorded references as described in Changing spectra.
In Breeze, you can view spectra in different representations — Raw, Radiance, Reflectance, or Absorbance — directly within Spectral Viewer and Pixel Explore. Spectra can be stored and later compared side-by-side in the Spectrum Plot for easy analysis.
References in Breeze
The default option for Breeze is to take dark and white references in Recorder before acquiring an image from a camera. After the recording, another dark reference is captured, and the average is saved.
Breeze can also cache references and re-use them for subsequent recordings when taking a reference would interrupt a real-time process or when the recording environment is very stable.
You can also take references manually in Settings > References, which is also where you can view the reference to gauge its quality and manage the current references and settings (see below).
If your hardware camera requires manual placing of references in front of the camera, Breeze shows a wizard to guide you which is described in the next section.
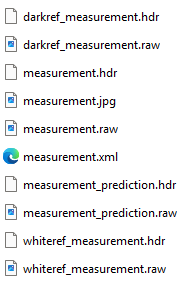
Regardless how references are taken, the references associated with an image are saved together with the captured measurements on disk. This is so that Breeze can dynamically convert between different spectral formats as described in Spectral imaging.
References for a measurement are viewed and edited on the Measurement References tab.
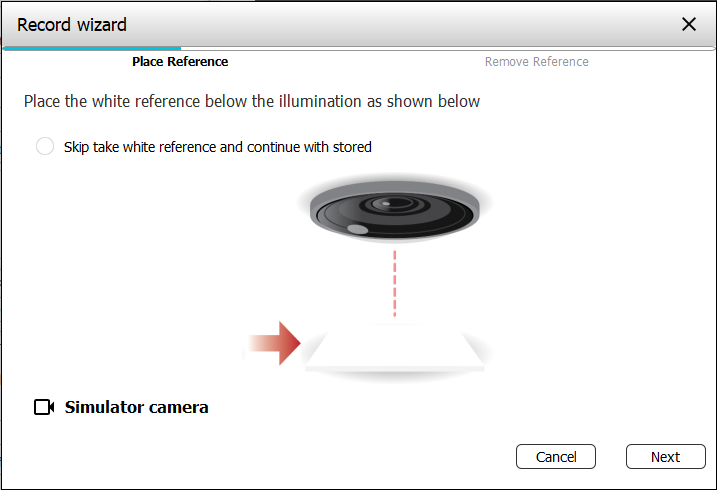
Taking references: Breeze Reference taking wizard
Taking references typically involves manually placing a white reference plate/material in front of the camera, completely covering the field of view. Breeze has a built-in wizard that guides you through the steps when manual interaction is needed.
Starting in Breeze 2025.1 Breeze analyzes the quality of the white reference when it is taken and prompts you if there are any issues that could lead to measurements with bad quality:
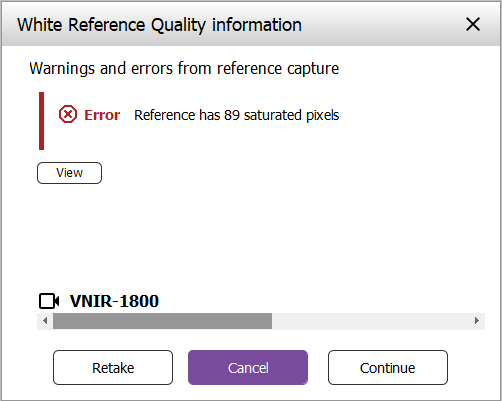
Click View to see information about the references. Then make corrections such as repositioning the white reference plate, or shortening the integration time if there are saturated pixels, and then click re-take the reference. You can also ignore the warning and continue using the reference.
Learn about the checks made by Breeze at the end of this page.
If you have hardware that always has saturated pixels and don’t want to use this verification, you can turn it off in Settings.
Inspecting references
The references for a measurement can be inspected on the References tab of the measurement, from Settings > References or when reference quality verification check finds an issue with the reference as described previously.
The information about the black- and white references looks like this:
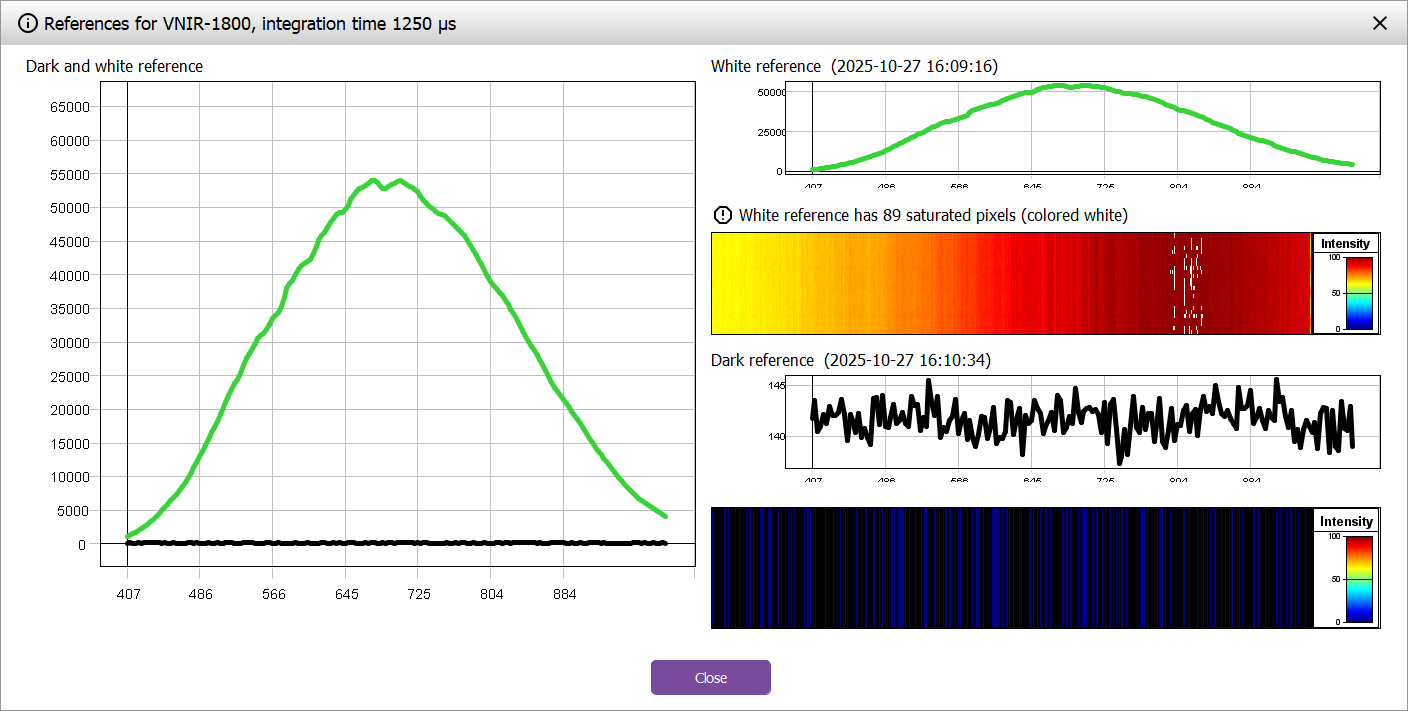
The plots show the average values for each wavelength for the white- and black reference.
Warnings for saturated pixels and other problems with the white reference are displayed above the visualization of the white reference. The number shows the number of pixels that are oversaturated in at least one wavelength band.
The references images display the actual white- and dark reference images, visualized as 2D saturation. The value and color of each pixel is the max saturation of any band in that pixel (values are normalized to go from 0 to 100). The color scale goes from blue to red, but zero pixels are black, and saturated pixels (100) are white.
Note that the dark reference displayed is the separately captured dark reference. It is not a dark reference specifically associated with the white reference image.
Some tips what to look for:
-
A white reference should be a uniform image the whole field of view. There should be no saturated pixels.
-
A black reference should be an essentially black image. Here it is expected that there are vertical bands, because each pixel in the sensor will result in the same data for all rows, since they are identical (shutter closed or lens manually covered).
Using a calibrated reflectance target for gray references
When you use a uniformly gray reference, instead of a white reference, you need to make Breeze aware of this using a calibrated reflectance target so that Breeze can calculate the right reflectance for measurements.
This target either is a file with values for each wavelength, or a uniform value that applies to all wavelengths. For example, for a gray target the value could be 50% or 75% for a lighter shade of gray.
You can specify this for an individual measurement on Measurement References tab.
You can also import the target to the active camera from the Settings > References page.
Managing camera references
References are managed on the References tab in Settings.
The page shows the references for the currently active camera which can be changed in the top-right corner of the screen:
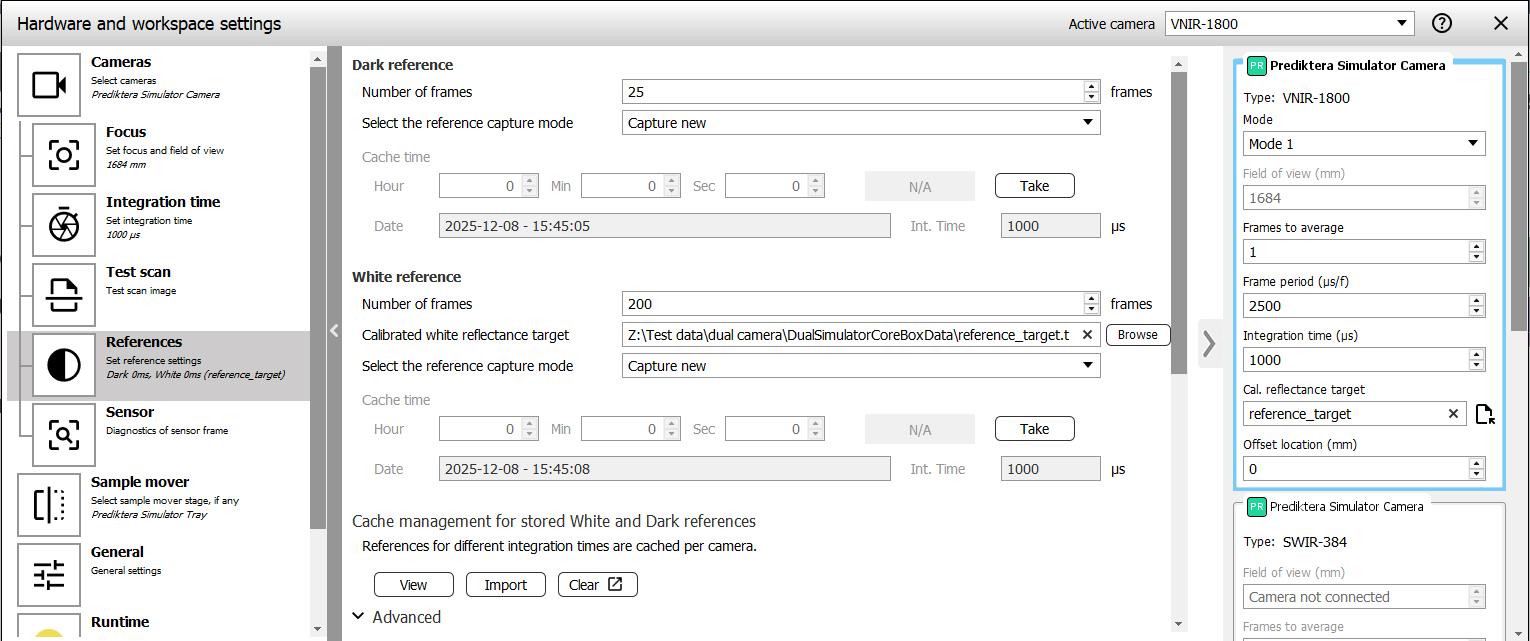
The page has Take-buttons to capture new dark and white references, and a button to View the current references, for the active camera.
The Breeze Runtime cache of stored references can be managed using the buttons:
-
Click View to visualize the dark and white references as described above. Data will be displayed for the currently active camera and integration time.
-
Use Import to read references from file and use for the current camera, in the case you cannot capture the references directly with the camera. You are prompted for the files containing the references, the integration time, and other settings.
-
Clear the current references for the active camera. You are prompted if you want to clear dark or white references, or both. This always removed the stored references for all integration times.
Specify the height of the reference by specifying the number of frames to capture. Use a reasonable number, but not too large as it results larger disk requirements. This setting is shared between all cameras.
The reference capture mode is configured for all cameras (cannot be changed individually for a specific camera):
-
Capture new - the default - always take a new reference when recording a measurement.
-
Use stored - cache and re-use taken references for subsequent recordings as long as the reference is recent enough and for the same integration time. This is a good option to use in industrial applications and when illumination and other environment factors don’t change within the specified cache time and when taking a reference would intereupt the process. Learn more about this in Store White and Dark references.
-
Disabled - do not take a reference or use it. Not recommended unless the hardware has no support for references. A dark reference should never be disabled, because taking it is typically very quick using the built-in shutter of the camera.
Notes:
-
References are captured per camera and stored per camera. Switch active camera in the upper right corner of the window and use the View button to inspect them.
-
Some Sample movers can automatically move the tray to take the references because the sample mover have settings in Breeze that specifies the position of the white reference on the tray/table.
-
RGB cameras use max/min signal from the senser as references, i.e. a physical reference plate is not used for those. This happens behind the scenes in Breeze, so that Breeze always can convert to Reflectance for RGB images, but the dark and white references are not always saved to disk with the measurement. The only time the references for RGB images are saved to disk is when they are captured in a multi-camera setup when two or more cameras are used to capture data at the same time.
Reference quality verification
Breeze verifies the reference quality in two places: in desktop Breeze when it captures a reference, and in the Runtime.
The screenshot above in the section ‘Taking references’ shows the warning Breeze displays when it detects a white reference of poor quality.
It is important to rectify any warnings and re-take the reference to ensure high and consistent quality of recordings in Breeze.
Runtime reference verification
The Breeze Runtime, independent of desktop Breeze, also analyzes the quality of the reference, and return any errors to third party applications which then can prompt the user to retake the reference until the quality is good.
This check is disabled by default, but can be enabled in Settings, if you in a third-party application want the Runtime itself return errors for poor reference quality. Desktop Breeze performs independent quality checks as described above, and does not use this setting.
Quality rules
Desktop Breeze and the Runtime verification checks use the same settings to determine what is a good or bad white reference. They use settings from the Reference page under Advanced:
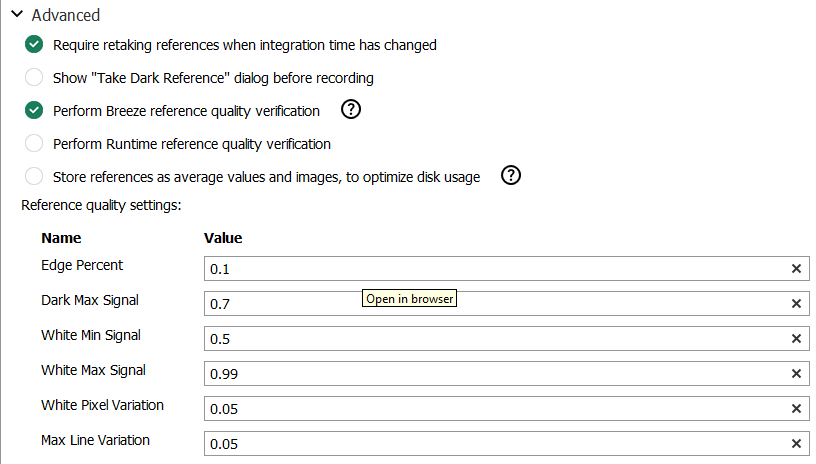
The settings are:
-
Edge percent - the fraction of the white reference’s width that should be ignored at the left and right sides of the image. A value of 0.1 means that 10% of the pixels are ignored at the left side and 10% are ignored at the right side. This setting is useful when reference doesn’t cover the whole width of the image.
-
Dark max signal - the maximum fraction of the expected signal for a dark reference. When the value is larger it triggers a warning. This setting can be used to catch incomplete cover of the lens, for example when there is no automatic shutter and the shutter was covered manually.
-
White min signal - the expected minimal fraction of the white references signal. If values are lower this indicates a too dark reference and triggers a warning.
-
White max signal - the maximum fraction allowed for the white reference signal. If values are greater, the value is considered saturated which is an error.
-
White pixel variation - how much pixels in a line are allowed to vary measured as the standard error. If the variation is larger a warning is triggered.
-
Max line variation - how much different lines in the reference image are allowed to vary measured as the standard error. If the variation is larger a warning is triggered.
Other settings
Under Advanced (picture above) there are also these settings for references:
-
Require retaking references when integration time has changed. This setting ensures the reference and the recorded images are comparable by requiring the same illumination in both.
-
Store references as average values and images, to optimize disk usage. Learn more in Reference averaging.
-
Historical reference files to keep (1-100). This setting controls how many old references are kept on disk for each camera when you use the option Use Stored to use cached references. Breeze periodically moves references that have expired to the
{Workspace}/Recycled/Referencesfolder to conserve disk space, if there are more than the configured number to keep for a camera.
Technical notes
Sub sampling of large references in Breeze for visualization
Breeze reduces large references so that not all frames are used when references (both dark and white) are used for visualizations in Breeze and Spectral Viewer. This is a speed optimization that makes all calculations much faster while still using a large enough sample of the reference data to ensure good results.
The reduction works by Breeze selecting up to 200 evenly spaced frames of the reference, even if it is larger in size.
Note that this optimization is only used in Breeze for visualization. It is not used in the when recording references, executing Analysis Tree, or running Runtime applications. Those always use the full references.
References that are narrower than the image
When the white reference tile is too narrow to cover the camera’s full Field of View (FOV), Breeze uses extrapolation to create a complete calibration file that can be used for the full FOV when recording data.
How it Works
Instead of using raw data from every pixel, Breeze focuses on the area where your tile is visible and follows these steps:
-
Isolate the Tile: The software identifies the exact pixels ($x$ and $y$ coordinates) where the white tile was detected.
-
Calculate the Average: It subtracts the "Dark Current" (sensor noise) and calculates a clean average intensity for every wavelength (color band) across that small area.
-
Fill the Gaps: Since the tile didn't cover the whole sensor, Breeze "stretches" that average value to fill the entire width of the FOV.
Depending on the camera, Breeze chooses one of two methods to spread the data:
-
With a Correction Profile (RE-frame): Recommended for high-end cameras like HySpex. Breeze multiplies the average white value by the camera’s unique optical profile. This accounts for natural lens effects like vignetting (darker edges) or smile, resulting in a highly accurate, synthetic white reference.
-
Standard Spread: If no profile is available, Breeze simply copies the average white value uniformly across every pixel. This creates a "flat" reference across the entire width.
To ensure no accuracy is lost during these calculations, the resulting white reference file is saved in 32-bit Float format. This provides much higher precision than the standard 16-bit raw data.